Roof racks for cargo boxes and sport cargo carriers have become very popular automotive exterior accessories for families and outdoor winter & water sport enthusiasts in North America. If you’re looking for a roof rack to carry your gear but are unsure which option is right for your vehicle and the specific equipment you'd like to carry, then you’ve come to the right place.
We’ll give you a full breakdown of the best roof rack options on the market and how they function to help you decide which one best suits your needs.
And if you’ve recently purchased a roof rack and have questions on how to install it home, we’ve got you covered. The installation process can vary between types of roof racks, but most follow some basic steps. Our guide will get your vehicle ready in no time for your next driving adventure.
What is a roof rack?
Benefits of Mounting a Roof Rack on my Vehicle
Types of Roof Racks and Roof Crossbars
What should I consider before purchasing a roof rack?
What are the best roof racks and crossbars?


Roof Rack Crossbars Installation Guide

What is a roof rack?
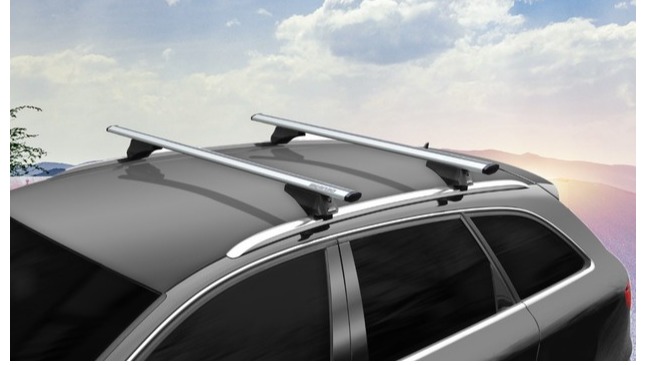
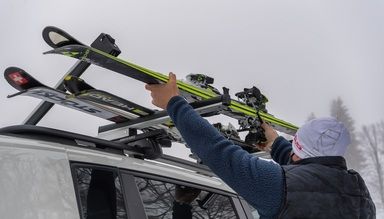
A roof rack is a popular automotive accessory that attaches to your vehicle’s roof rails and serves as a base system to carry cargo baskets, cargo boxes, bike carriers, ski and snowboard carriers, and watersport carriers.
A roof rack is constructed of aluminum, stainless steel, or a plastic composite that typically consists of two crossbars that latch onto your vehicle’s raised roof rails or flush rails with a tight clamping mechanism, and usually lock in place with a key.
Roof racks have become one of the most popular exterior accessories for sedans, hatchbacks, SUVs, and even pick-up trucks in Canada and the US, with individuals looking for options to exercise outdoors and take domestic vacations with their friends and families.
The roof rack options available on the market can vary depending on the size of your specific vehicle and the fitment on its roof, particularly if there are existing raised or flush roof rails. We’ll go into more detail a little later on to help determine which option best suits your vehicle and needs.
Benefits of Mounting a Roof Rack on my Vehicle
Most vehicles are too small to fit bikes, skis, snowboards and water sport equipment between the backseat and trunk, especially when carrying other gear and luggages for a vacation or weekend road trip. Trunk and hitch mounted racks for bikes and cargo baskets can also restrict access to the trunk by blocking the rear hatch or trunk door, making it difficult to access your cargo while they’re mounted.
A roof rack designed for your car or SUV on the other hand allows you to safely and easily transport your bikes or sporting gear without taking up all of your interior cargo capacity and running the risk of damaging the interior fabric lining or scratching the exterior paint of your vehicle. Roof racks allow smaller vehicles such as sedans or hatchbacks to carry a large cargo box and as many as four bikes, six sets of skis, four snowboards, or a kayak without requiring a hitch mounted trailer.
Roof racks for pickup trucks are also useful as they allow you to maintain the truck bed’s full cargo capacity by holding your bikes, skis, snowboards, or kayaks above the box itself. Now let’s look at the types of roof racks and how they function to help determine which one best suits your vehicle and budget for your next outdoor adventure.
Types of Roof Racks and Roof Crossbars
Roof racks are normally categorized based on how they physically connect to your vehicle’s rooftop, their dimensions for proper fitment, strength and durability of the hardware, and their ability to work with a range of rooftop accessories.
Roof Racks for Flush Rails Vs Raised Rails
Most roof racks do not universally fit on all vehicles, and many require a vehicle to be equipped with existing roof rails along both sides of the roof, above the front and rear doors.
Roof racks and roof crossbars are designed to fit perpendicularly along either 1) flush roof rails, 2) raised roof rails, or 3) connect directly onto a vehicle’s rooftop.
The types of rails available on any given vehicle can be automotive manufacturer dependent, with some offering the choice of flush rails, raised rails, or often no rails at all. Sport utility vehicles and minivans are more commonly equipped with flush or raised roof rails, while sedans and hatchbacks often require them to be a part of a special package or added feature when purchased directly from the manufacturer.
Flush roof rails are more commonly found on vehicles without a sunroof and a fairly flat surface. If your vehicle does have a sunroof and flush rails, you typically cannot open the sunroof while a roof rack and crossbars are installed. The maximum payload for flush rails is around 75 kg or 165 lbs when aluminum crossbars are installed.

Raised roof rails may not be as aesthetically appealing as flush rails, however they’re much more functional as they typically allow for a sunroof to be open when the roof crossbars are mounted, and often have higher payload of around 90 kg or 200 lbs with aluminum or stainless steel crossbars. This added weight capacity can provide the option of carrying one or two more bikes, or a larger cargo box or basket with heavier camping gear.
Roof racks and crossbars that connect to raised rails also tend to be slightly more secure as they latch around the rails with a tighter fit than crossbars on flush rails.

Vehicles that are equipped with neither flush nor raised roof rails can typically also carry a roof rack system, however they’ll require additional adaptors to connect crossbars directly to the roof’s surface, and need a longer installation process.
You’ll find that many vehicles without any existing rails will have four small slots along the roof that serve as connecting points for a roof rack. It’s important to follow your specific vehicle’s manual to determine the weight capacity for any roof racks and cargo you plan to carry along the roof.
Truck Bed Mounted Roof Racks
Bed mounted roof racks are popular options for pick-up truck owners, especially ones with shorter boxes as they mount above the truck’s bed without limiting cargo capacity.
These roof racks and crossbars require truck specific mounting bars or rails to be installed along the sides of the truck box; the installation and removal process is similar to roof rack carriers but allows for a much easier process to mount a bike carrier or ski and snowboard carrier since you can stand level inside the truck’s bed.
Aluminum Roof Racks Vs Plastic Crossbars
Metal based roof racks and crossbars constructed of aluminum or stainless steel provide a much stronger and durable base for mounted cargo boxes, cargo baskets, and sport carriers than roof racks made solely from a plastic composite.
Aluminum roof racks have a much higher weight capacity than plastic crossbars, allowing you to carry multiple sets of skis, bikes, and heavier cargo boxes and baskets. Both types typically attach to your vehicle’s roof rails, which are commonly found on wagons and larger vehicles such as SUVs and minivans.
Aluminum or steel based roof racks and crossbars usually cost between $200 and $300, depending on the width of the vehicle’s roof, and are worth the added investment as they serve as a strong foundation for your rooftop cargo carriers, bike racks, ski and snowboard carriers, and kayak carriers.
What should I consider before purchasing a roof rack?
Before purchasing a roof rack you should ask yourself a few questions to help determine which option best suits your needs and vehicle.
Will this roof rack fit on my vehicle?
Most roof racks do not universally fit all vehicles, and tend to better suit sedans, hatchbacks, and SUVs that have existing raised or flush roof rails. However, there are roof racks and crossbars that can be attached to vehicles that do not have roof rails, and those will require special adapters to connect to your roof.
The width of most vehicle roofs tend to fall between 47 inches and 51 inches so search for a roof rack that fits your vehicle's specific dimensions.
Bed mounted roof racks are also great options for pick-up trucks with smaller box sizes as they’re easy to install and mount while standing inside the truck bed. Just ensure that the crossbars and mounting plates fit the dimensions and width of the bed for your truck’s make and model prior to purchasing.
Do you need roof rails to install a roof rack?
Roof rails are necessary to safely connect most roof racks and crossbars to the roof of your vehicle. On that point, roof crossbars serve as the base foundation that holds up most rooftop cargo boxes, bike carriers, ski carriers, and water sport carriers. Roof rails are not standard attachments on most vehicles, so prior to purchasing a roof rack for your vehicle, confirm if adaptors or additional attachments are available to safely install and mount directly on your specific vehicle’s roof.
Is this roof rack compatible with cargo boxes, baskets, bikes, skis, snowboards, or water sport carriers?
If you enjoy participating in other sports and activities that require a rack to carry equipment such as bikes, skis, snowboards, or a cargo basket, then purchasing a durable roof rack with crossbars is a great option for cross functional compatibility.
Menabo branded roof racks are compatible with many bike carriers, ski and snowboard carriers, kayak carriers, and cargo boxes. You may require adaptors and additional attachments in order to securely install and mount one brand of cargo carriers onto another brand of roof crossbars as the width of the crossbars and total weight capacity may vary.
Aluminum roof racks that connect to raised rails tend to have a higher weight bearing capacity than racks and crossbars that connect to flush rails, and both types can carry more weight than racks and crossbars that are installed directly to a vehicle’s roof. Plastic roof racks carry even less weight, so it’s important to understand how much combined weight you need to carry on your vehicle’s rooftop prior to purchasing roof crossbars.
Will I need to park my vehicle underground or under a low vehicle clearance?
Carrying cargo or sporting gear on top of your roof rack will add to the height of your vehicle. Roof mounting bike racks and cargo boxes for instance will add a few feet of height so make sure to understand your vehicle’s parking conditions in order to not exceed a clearance in an underground garage or drive-through underpass, particularly if driving a larger SUV or minivan.
What are the best roof racks and crossbars?
There are many roof rack options available on the market that claim to safely carry a variety of roof mounting carriers, however, only a few offer the strength, durability, and versatility that most outdoor enthusiasts need and desire.
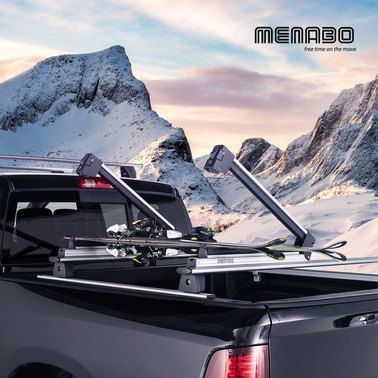
Menabo for instance has a rich history of producing superior roof racks and a large range of compatible cargo boxes, bike racks, ski racks and snowboard carriers, and watersport carriers thanks to its extensive investment in R&D. Menabo has become a best selling brand in Europe and abroad with its focus on premium design, safety, and durability, blended with the elegance of Italian craftsmanship.
Menabo aluminum roof racks and crossbars are available in both universal and custom fit options for a wide range of vehicles, with two standard width options for cars and SUVs equipped with raised roof rails, flush roof rails, or select vehicles with no roof rails at all.
Menabo Sherman Black and Tiger Black roof rack and crossbars for instance are made of a strong aluminum frame, and securely connect to raised roof rails and flush roof rails respectively with an anti-theft key locking mechanism. These roof crossbars, available in both 47" and 51" lengths, serve as a strong foundation for rooftop mounted cargo and are compatible with multiple Menabo bike racks, cargo boxes, ski racks, and kayak carriers, with a maximum payload of 90 kg or 200 lbs. Please note that weight capacity can vary slightly depending on your specific vehicle’s roof weight-bearing restrictions.
Roof Rack Crossbars Installation Guide
Installing a roof rack on the roof of your vehicle, such as a Menabo branded roof rack, is simple to do at home in less than 30 minutes IF your vehicle is already equipped with raised or flush roof rails.
If your vehicle does not have existing roof rails, you can still install crossbars, however they’ll require special adaptors to connect directly to the roof itself and will take closer to 45 minutes to 1 hour to install at home to ensure it connects safely. Contact the manufacturer to determine if a Menabo roof rack will fit directly onto your roof without rails.
Start by laying out all the roof rack and crossbar installation components on a table. The exact number of screws, bolts, and connecting pieces required for assembly will vary slightly by make and model of the roof rack and the type of rails on your vehicle.


Most roof racks systems do not require the use of power tools, and can be installed using a 5 mm hex key or allen key. You may want to use a small step ladder as well in order to have a more bird’s eye view of the roof while installing the crossbars, especially on an SUV without step bars or running boards.


1) Clean your Roof Rails
- Wipe down your raised or flush roof rails with some water and mild soap to remove any dirt or residue.
- Use a microfiber cloth to dry it fully.
2) Fill the Empty Profile Slots of Lower Side of Crossbars
- If the roof crossbars have empty profile slots on their lower side, use the provided rubber profile strips to fill the gaps.
- Measure and cut three rubber strips for both crossbars at the same length as the three gaps, and insert them in the gaps.
- Ensure that you completely close the grooves on both crossbars in order to avoid hearing any whistling while driving.
NOTE: You can also complete this step AFTER installing the crossbars along the roof rails, in particular for the outer gaps where you’ll have a more accurate fitment.
For raised roof rails, please follow Steps 3 - 8
For flush roof rails, please follow Steps 9 - 15
3) Expand the Jaws on the Roof Crossbars
- Insert the allen key into the holes on the front ends of the roof crossbar adaptors and turn counterclockwise to expand the jaws that connect to the raised roof rails.
- Repeat for the rear crossbar.
4) Place Roof Crossbars onto the Raised Roof Rails
- Place the connecting pieces of the roof crossbar onto the front end of both raised roof rails.
- Ensure that the crossbar is perfectly centered along both rails by checking the extremities from the front and rear of the vehicle.
- Repeat for the rear crossbar.
- Check to ensure that the distance between the front and rear crossbars is a minimum of 70 cm or 27.5 inches.
5) Tighten the Jaws on the Roof Crossbars to the Raised Roof Rails
- Insert the allen key into the holes on the front end of the crossbar adaptors and turn clockwise to tighten the jaws against the raised roof rails.
- Ensure that you have a tight fit, and that the crossbar is perpendicular to the raised rail on both ends.
- Repeat for the rear crossbar, and ensure the minimum distance of 70 cm or 27.5 inches is maintained between the front and rear bars.
6) Lock the Roof Crossbars with the Anti-Theft Key Lock
- If your roof rack includes a key locking mechanism, use the provided key to lock the crossbar in place by turning the key clockwise into the locked position.
- Repeat for the rear crossbar.
7) Check Positioning of the Roof Crossbar Jaws against the Raised Roof Rails
- The rails edge should lean on the outer side of the crossbars jaws, as shown below.
- If not, unlock the anti-theft mechanism in step 6, and repeat step 5 by holding the jaw pushed up toward the rail while turning the allen key.
8) Test the Sturdiness of the Roof Rack against the Raised Roof Rails
- Test the sturdiness of the installed roof crossbars by gently pushing and pulling them in all four directions while in the locked position.
- If the crossbars feel secure, tug at them more firmly in each direction.
- The crossbars should not move.
- If they feel loose, repeat steps 5 - 7 above to ensure the crossbar jaws are aligned and tightened against the raised roof rails.
Please follow Steps 9 - 15 for vehicles with flush roof rails:
9) Set the Distance of the Jaws on the Roof Crossbars
- Set the distance on both sides of the roof crossbar jaws that connect to the flush roof rails.
- Repeat for the rear crossbar.
10) Place Roof Crossbars onto the Flush Roof Rails
- Place the connecting pieces of the roof crossbar onto the front end of both flush roof rails.
- Ensure that the crossbar is perfectly centered along both rails by checking the extremities from the front and rear of the vehicle.
- Repeat for the rear crossbar.
- Check to ensure that the distance between the front and rear crossbars is a minimum of 70 cm or 27.5 inches.
11) Tighten the Jaws on the Roof Crossbars to the Flush Roof Rails
- Use the allen key on the ends of the crossbar adaptors and turn clockwise to tighten the jaws against the flush roof rails.
- Ensure that you have an even, tight fit, by working continuously on both the right and left side of the crossbar.
- The crossbar should be perpendicular to the flush rail on both ends.
- Repeat for the rear crossbar, and ensure the minimum distance of 70 cm or 27.5 inches is maintained between the front and rear bars.
12) Install the End Caps onto the Jaws of the Roof Crossbars
- Install an end cap on both sides of the roof crossbar jaws and ensure that the key is in the horizontal position.
- Repeat for the rear crossbar.
13) Lock the Roof Crossbars with the Anti-Theft Key Lock
- If your roof rack includes a key locking mechanism, use the provided key to lock the crossbar in place by turning the key clockwise into the locked position.
- Ensure the key slot is in the locked vertical position in order to block both end caps, then remove the key.
- Repeat for the rear crossbar.
14) Test the Sturdiness of the Roof Rack against the Flush Roof Rails
- Test the sturdiness of the installed roof crossbars by gently pushing and pulling them backwards and forward while in the locked position.
- The crossbars should not move.
- If they feel loose, repeat steps 11 - 13 above to ensure the crossbar jaws are aligned and tightened against the flush roof rails.
15) Fill the Remaining Empty Profile Slots of the Lower Side of Crossbars
- Complete Step 2 now if you haven’t already done so.
- If the roof crossbars have empty profile slots on their lower side, use the provided rubber profile strips to fill the gaps.
- Measure and cut three rubber strips for both crossbars at the same length as the three gaps, and insert them in the gaps.
- Ensure that you completely close the grooves on both crossbars in order to avoid hearing any whistling while driving.
Summary of Roof Rack Installation Steps for Raised Rails
- Wipe clean the roof rails
- Fill the empty profile slots on the crossbars’ lower side
- Expand the jaws on the roof crossbars
- Place the roof crossbars onto the raised roof rails
- Tighten the jaws on the roof crossbars to the raised roof rails
- Lock the roof crossbars with the anti-theft key lock
- Check the positioning of the roof crossbars’ jaws against the raised roof rails
- Test the sturdiness of the roof crossbars against the raised roof rails
- Fill the remaining empty profile slots of the crossbars’ outer lower sides with the rubber profile strips
Summary of Roof Rack Installation Steps for Flush Rails
- Wipe clean the roof rails
- Fill the empty profile slots on the crossbars’ lower side
- Set the distance of the jaws on the roof crossbars
- Place the roof crossbars onto the flush roof rails
- Tighten the jaws on the roof crossbars to the flush roof rails
- Install the end caps onto the jaws of the roof crossbars
- Lock the roof crossbars with the anti-theft key lock
- Test the sturdiness of the roof crossbars against the flush roof rails
- Fill the remaining empty profile slots of the crossbars’ outer lower sides with the rubber profile strips
It was that easy. Now your newly installed roof crossbars are ready to serve as a base to connect a cargo box, cargo basket, ski rack and snowboard carrier, bike rack, or water sport carrier for your next adventure!
How do I reduce the whistling noise while driving with a roof rack?
Some roof racks may cause a whistling sound while you’re driving. In order to reduce the noise, move both roof crossbars slightly further down the rails towards the rear of the vehicle’s roof. This should change the wind resistance.
- Unlock the key mechanism by turning the key counterclockwise.
- Use the allen key to loosen the jaws of both crossbars around the roof rails.
- If the roof crossbars have empty profile slots on the bottom side, use rubber profile strips to fill the gaps.
- Slide both crossbars down the rails towards the rear, ensuring that a minimum distance of 70 cm or 27.5 inches is maintained between the two crossbars.
- Once aligned, tighten the jaws of the roof crossbars and use the key to lock the bars in their final position.
- Test the sturdiness of the roof rack against the rails by pushing and pulling the crossbars to ensure they do not move prior to driving.
Now that we’ve covered the types of roof racks and roof crossbar options available on the market, along with the step by step instructions on how to install one on the roof of your car, truck, or SUV, you’re now one step closer to choosing the best roof rack for your vehicle and next outdoor adventure.