Hood bug deflectors are popular pickup truck accessories that provide protection from road debris and bug splatter, all while adding a sleek or rugged feature to the front of your truck.
If you’ve recently purchased a hood bug deflector, or have questions on how to install it at home, you’ve come to the right place. The installation process can vary between types of hood deflectors and even by brand or manufacturer, but most follow some basic steps. We’ll get your truck, Jeep, or SUV ready for the road in no time with our simple step by step installation and removal guide.
What is a bug deflector?
Types of Bug Deflectors
Do bug deflectors work?
How to Remove a Hood Guard Bug Deflector
Advantages of a Tough Guard Hood Deflector
What is a bug deflector?
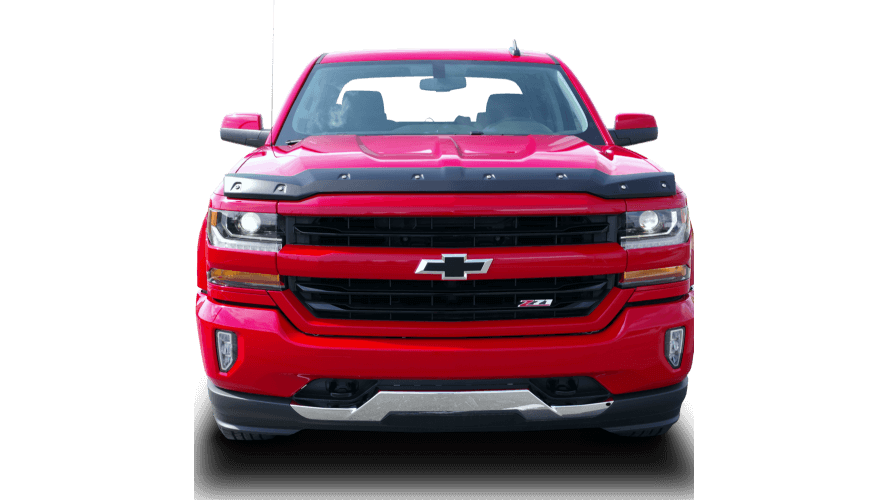
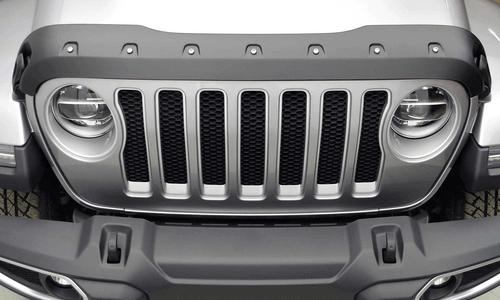
A hood bug deflector is an exterior automotive accessory, most commonly installed on pickup trucks, Jeeps, and SUVs, that attaches to the front end of a vehicle's hood to provide both functional and aesthetic benefits.
Hood deflectors are also known as hood guards, hood protectors, bug deflectors, and bug shields as their main design purpose is to deflect road debris such as stones, rocks, and insects from hitting your vehicle's hood or windshield. This helps minimize unwanted scratches and dents while driving.

Types of Bug Deflectors
Acrylic Bug Deflector
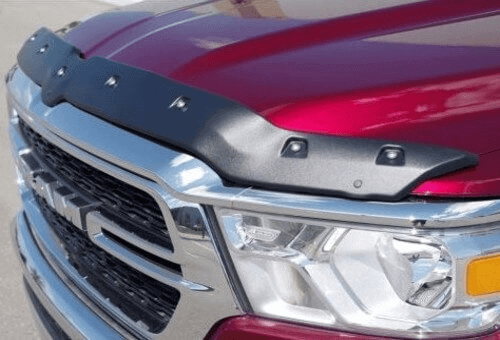
Hood bug deflectors are typically constructed from a strong acrylic plastic material that provide a sleek, stylish design feature to complement the front end of your vehicle.
Acrylic bug shields commonly have a textured finish, with a stainless steel bolt pattern for a more rugged appearance. They can also have a smooth finish, and are typically black or are paintable to match other popular exterior auto & truck accessories such a window visors and fender flares.
Metallic Bug Deflector
Hood shields can also be constructed with a metallic base, typically chrome or stainless steel that won’t rust from rain, snow, or other inclement weather.
Both types of bug deflectors are popular in North America as they offer very similar functionally. The main drivers for purchasing one style over the other are usually individual design preferences and matching other exterior features on one’s vehicle.
The installation process is similar among acrylic and metallic hood protectors, with double sided tape, or occasionally screws installed under the hood, being used to set the deflector in place.
Do bug deflectors work?
Larger vehicles that sit high off the ground will attract bug splatter and road debris that are spit up from the tires of other vehicles, particularly when driven on uneven surfaces or unpaved roads.
A well constructed hood guard bug deflector will have an aerodynamic design that helps create an upstream of air flow over your vehicle’s hood and windshield. The change in air flow while the vehicle is in motion helps stream most small road debris such as rocks or stones over your vehicle, along with deflecting away flying insects.
Although not perfect, well designed bug deflectors do greatly reduce bug splatter and scratches from stones and other flying debris, especially on paved roads.
Brand reputation and product reliability are important factors when purchasing a bug deflector. It’s crucial to choose a manufacturer that is well regarded in the automotive aftermarket industry for producing well designed bug deflectors that won’t crack or fade, such as Canadian-made Tough Guard and FormFit hood protectors.
Hood Guard Bug Deflector Installation Guide
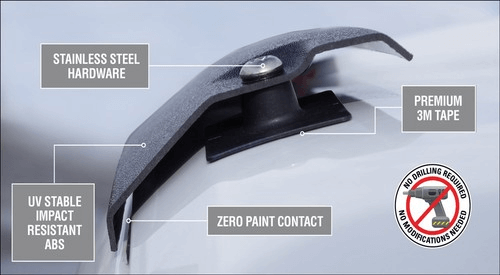
Installing a hood guard bug deflector such as a Tough Guard branded protective hood shield is simple to do at home with no drilling required.
Whether you’re completing the installation process in a garage or on a driveway, the ideal temperature for installation is between 20-35 degrees Celsius (68-95 degrees Fahrenheit). If it’s too cold (below 15 degrees C) or too hot (over 43 degrees C), the bumpons and 3M adhesive will not stick well.
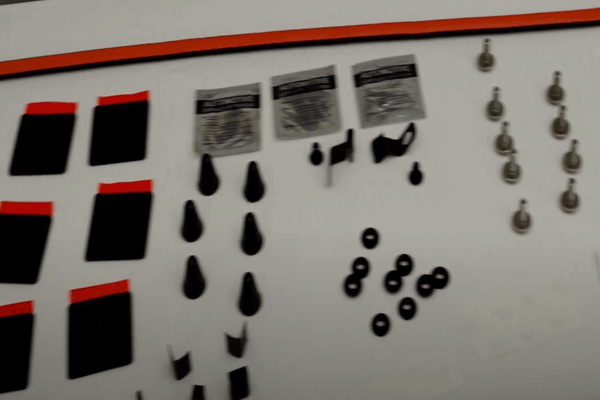
Required Tools for Installation:
- Screwdriver with T45 Torx or 7/32 Allen head and Phillips head;
- Measuring tape;
- Scissors;
- Marker;
- Water and basic soap;
- Paper towels or microfiber cloth;
- Automotive Surface Cleansing napkin (provided in packaging);
Start by laying out all of the provided installation components on a table.
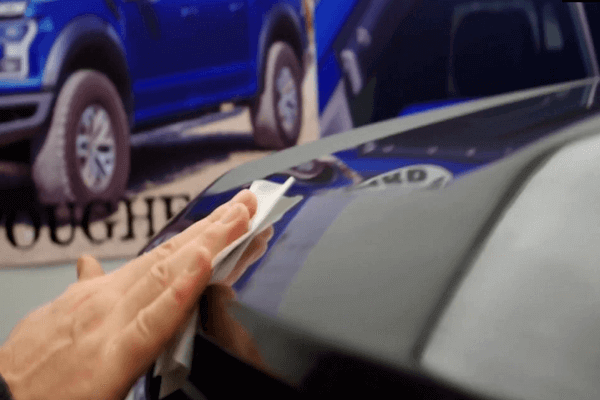
1) Clean the Hood
- Ensure the area on the hood where you’ll be installing the hood guard is clean and dry prior to installation of any components.
- Wipe down the area with some basic soap and water; remove all soap residue and ensure the area is dry.
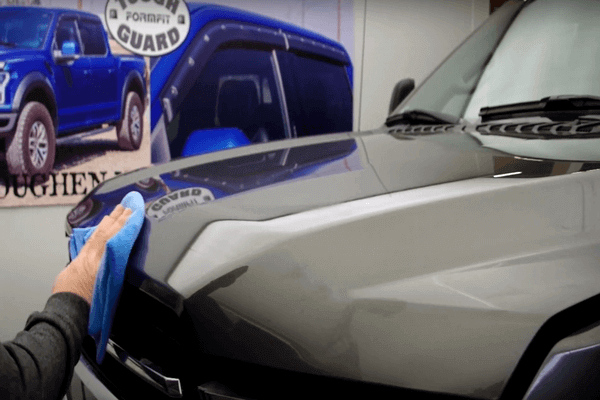
- Now use the automotive surface cleaning wipes provided in the packaging to further clean the hood.
2) Install Bumpons
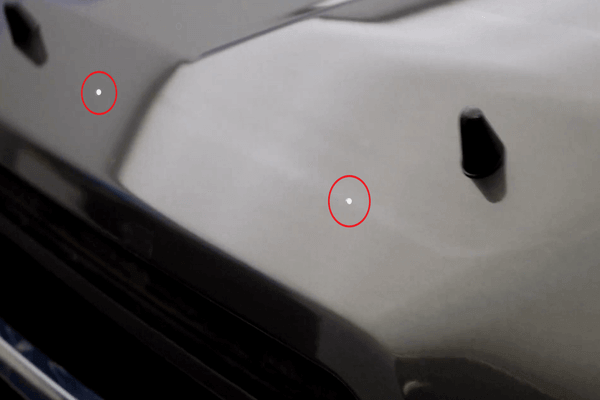
- Use tape measurer to measure the bumpons from the edge of the hood.
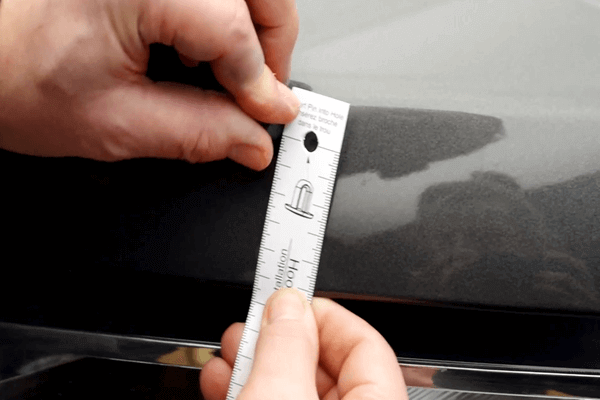
- The exact distance in millimeters where the bumpons need to be installed on the hood may vary slightly depending on the make, model, and year of your truck, so please follow the measurements provided in your package.
- Eg. For a Ford F-150, the first bumpon should be installed approximately 100 mm from the corner of your hood.
- Place bumpons on the hood, not the deflector.
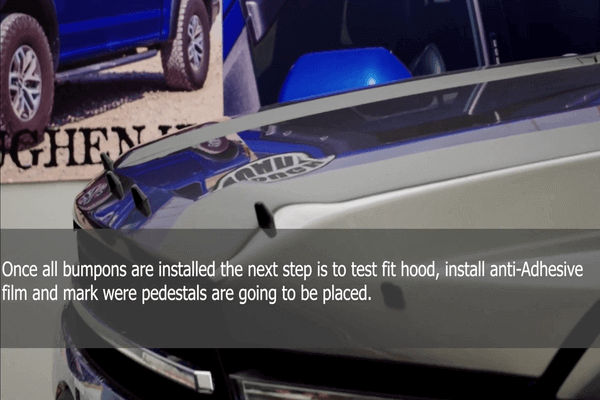
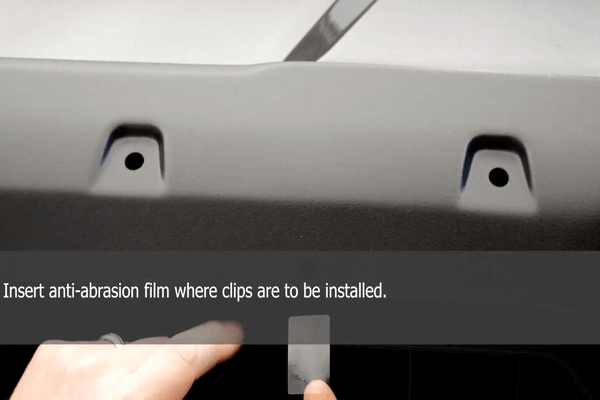
3) Test Fit & Install Anti-abrasion Film
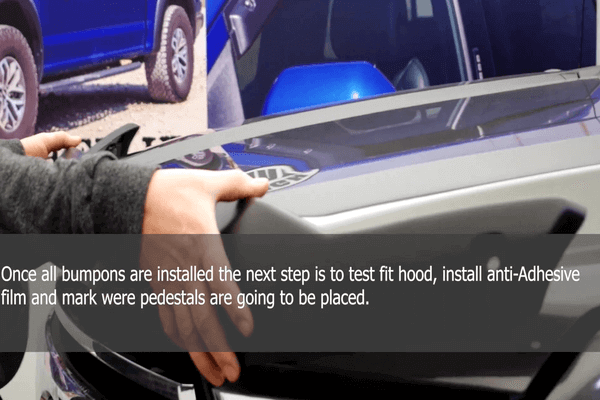
- Insert the anti-abrasion film where the clips are to be installed later on.
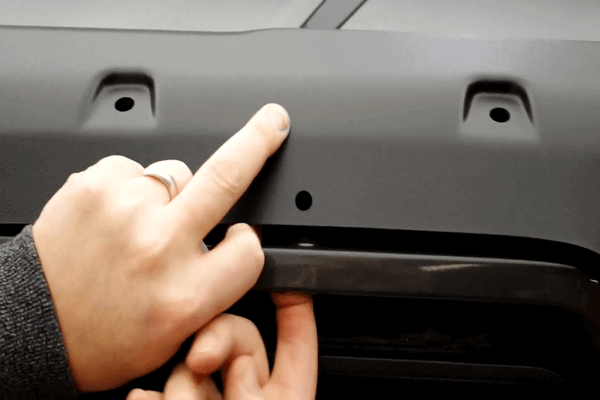
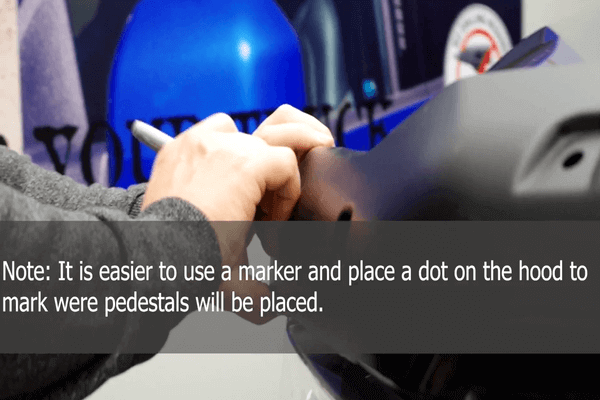
4) Mark Dots for Pedestals
- It's helpful to mark the area where the pedestals will be installed with a small dot using a washable marker.
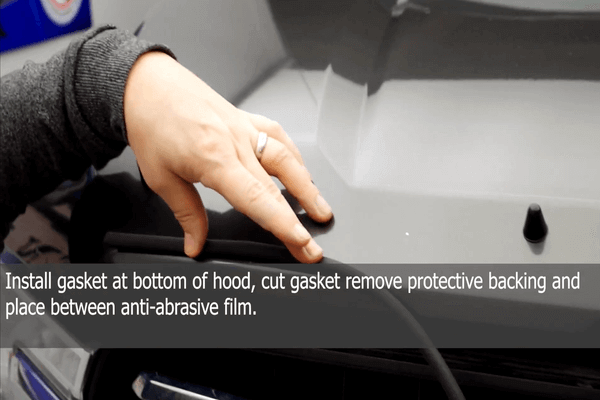
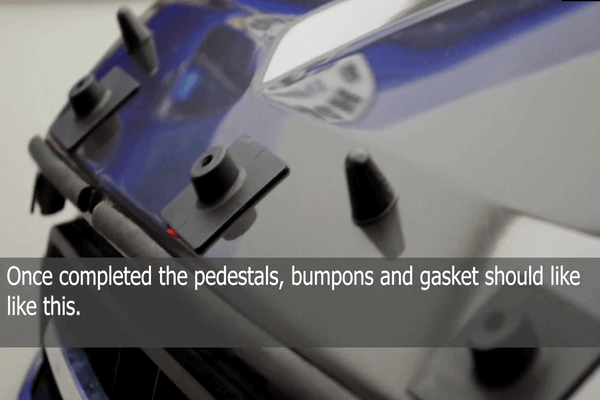
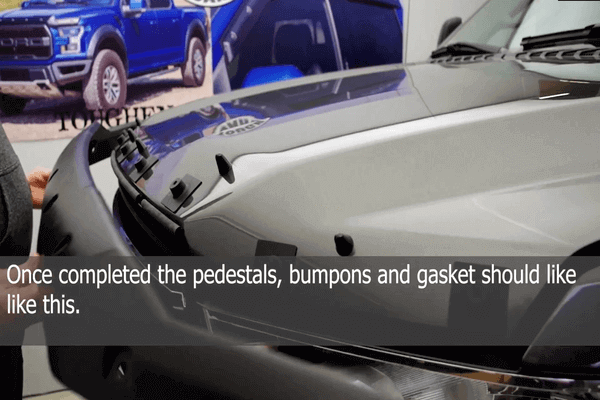
5) Install Gasket
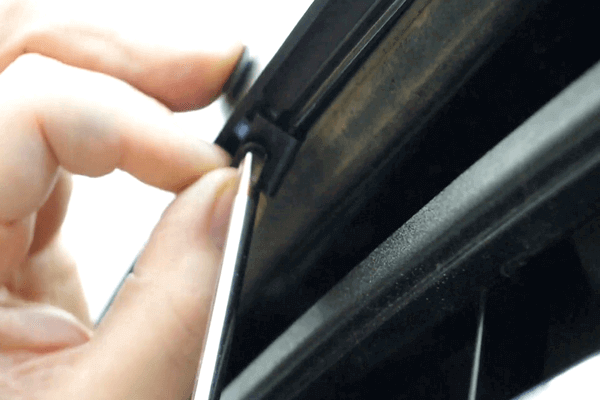
- Cut the rubber gasket into smaller pieces to angle against the hood.
- Remove the protective backing and install the rubber gasket at the base of the hood and place between the anti-abrasion film.
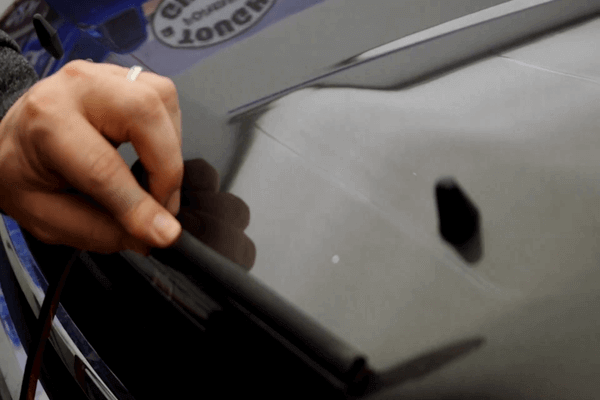

6) Install Clips
- Place the bug deflector on the hood.
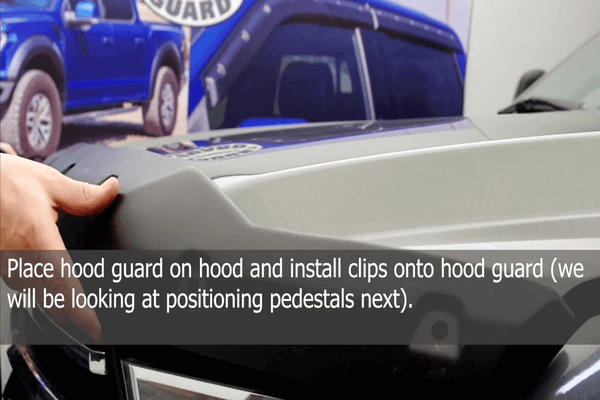
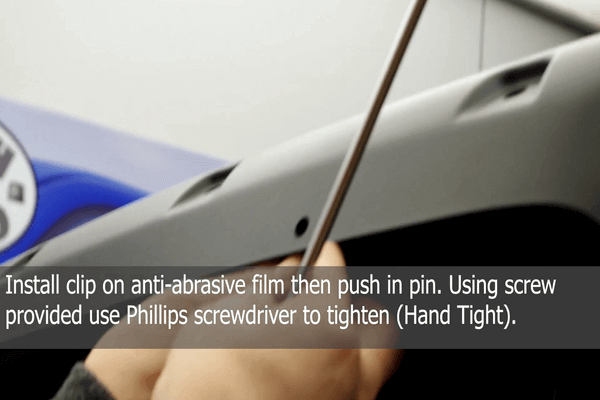
- Install the clip onto the anti-abrasion film and push in the pin.
- Use a Phillips head screw driver to hand tighten the provided screw.
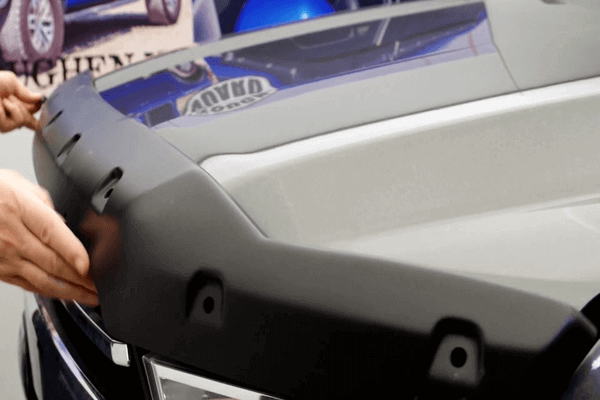
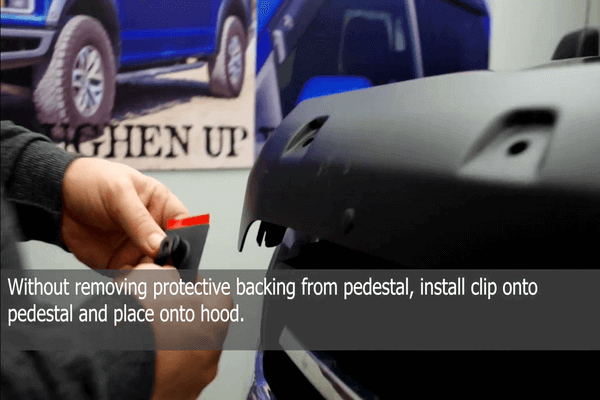
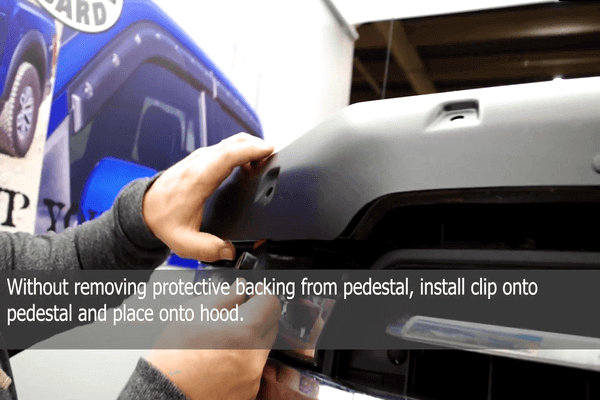
- Install clip onto pedestal without removing the protective backing from the pedestal and place it onto the hood.
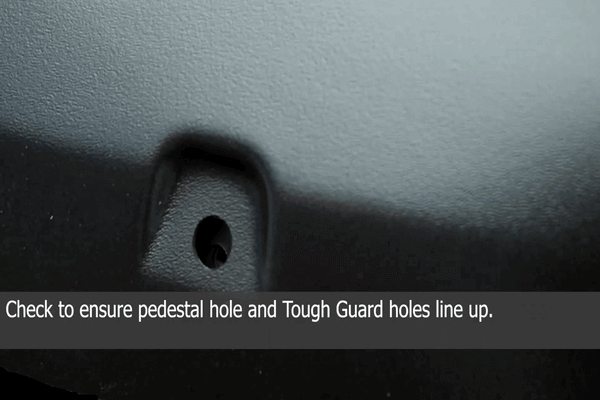
- Check to ensure the pedestal hole and the hood deflector holes are aligned.
- Remove the hood deflector to begin the installation of the pedestals.

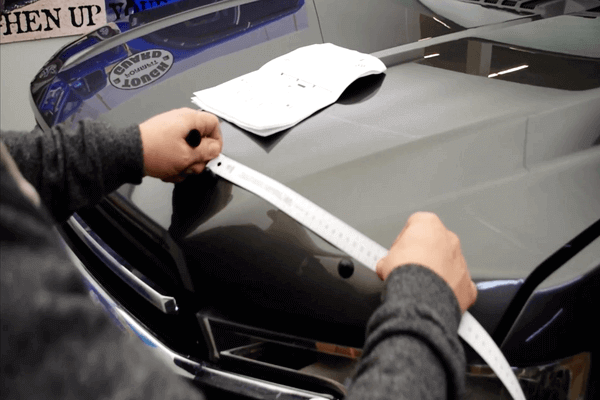
7) Install Pedestals
- Locate the center of the hood, and temporarily tape in place the two centre pedestals approximately 100 mm from the middle of the pedestal to the centre of the hood. Exact distance will vary depending on each vehicle, as some hood deflectors will include a variation of pedestals (7-9 in total).
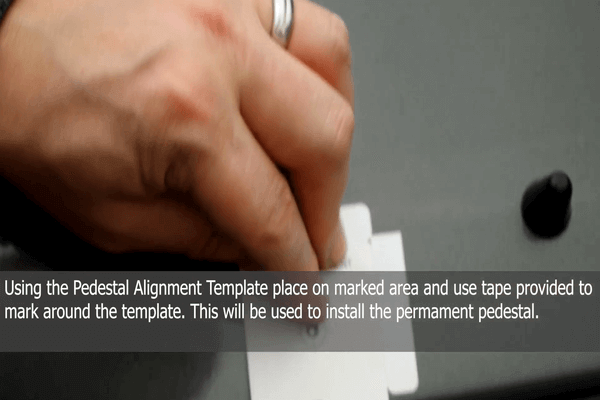
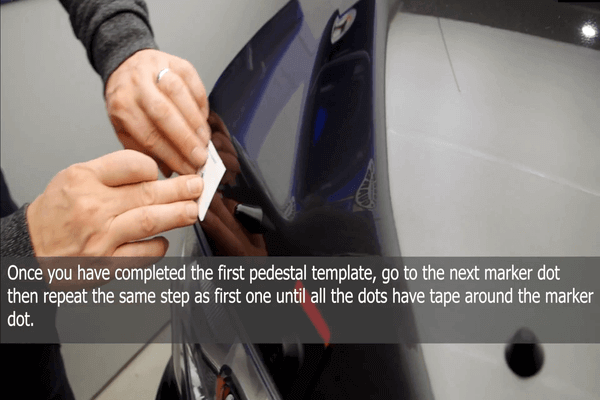
- Place the pedestal alignment template around the marked dots and tape around it.
- Once you've completed the first pedestal template, go to the next marked dot and repeat the previous step until you've placed tape around all the dots.
- Measure to the front measurement mark on the pedestal, and temporarily tape in place the pedestals at the specific measurements.
- Repeat the same step until all of the pedestals have been taped in place.
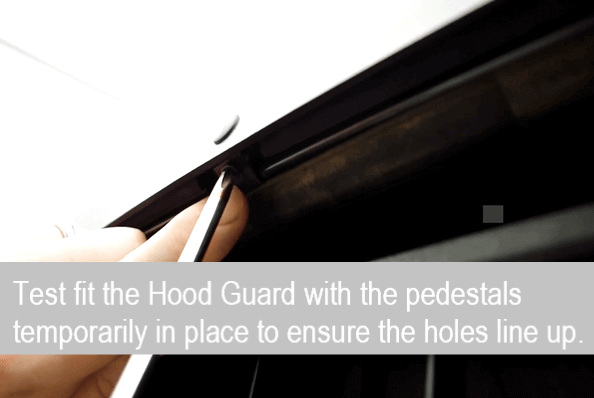
8) Test Fit Hole Alignment
- Place the hood deflector on the bumpons, ensuring that it’s properly centred.
- Look through the holes to make sure each pedestal is aligned with the hole in the deflector.
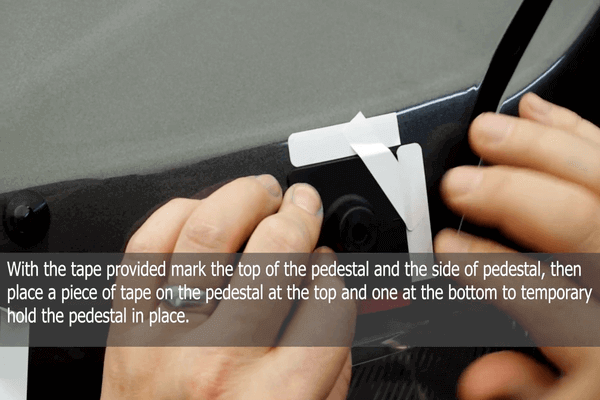
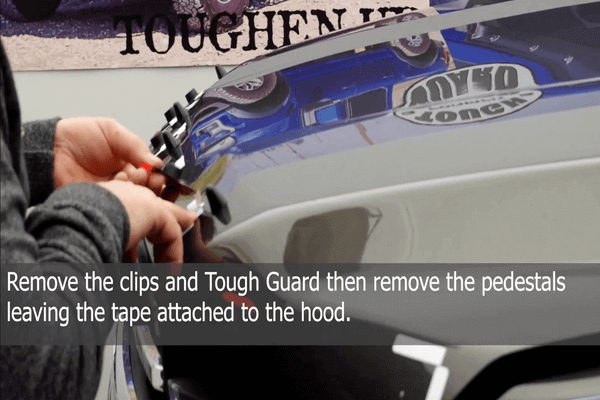
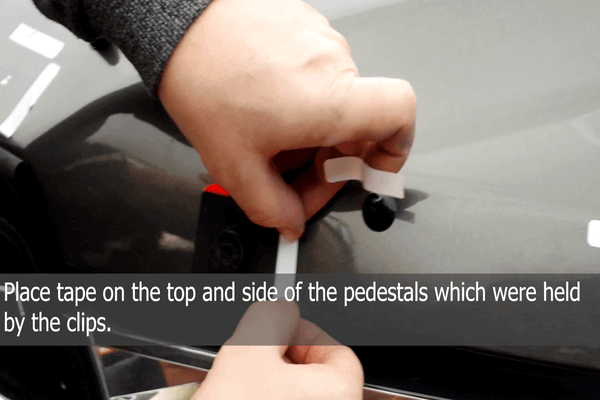
9) Attach Pedestal Tape
- Remove the hood deflector and adjust any pedestals that aren’t aligned.
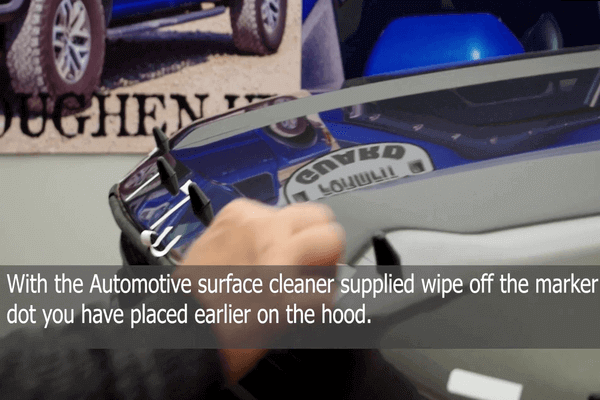
- Once you’re satisfied with the position of the pedestals, line up new pieces of tape with the outside of the pedestals (left, right, and top).
- Remove the pedestals, keeping the new tape in place.
- Clean the mounting pedestal area at each location with the provided automotive surface cleaner, wiping it dry with a clean cloth, paper towel.
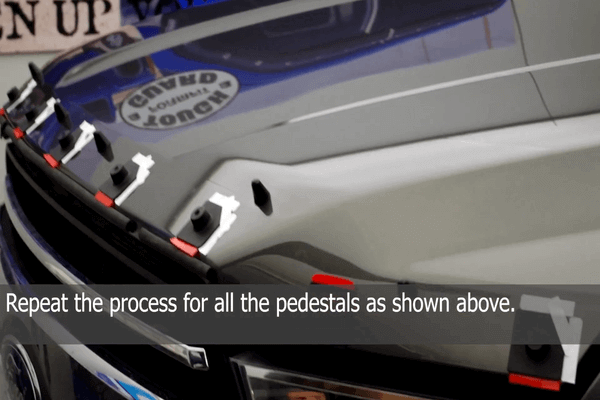
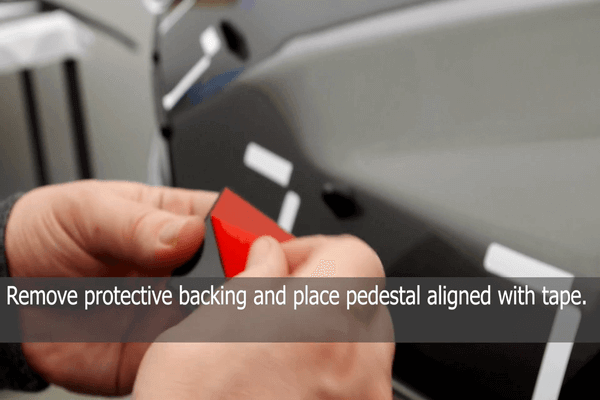
10) Attach Pedestals
- Peel the red protective backing off one of the pedestals, and carefully place it on the hood’s surface where the new tape is located.
- Please ensure each pedestal location is aligned with the holes of the hood deflector and level with the hood to avoid a slow removal process.
 .
.
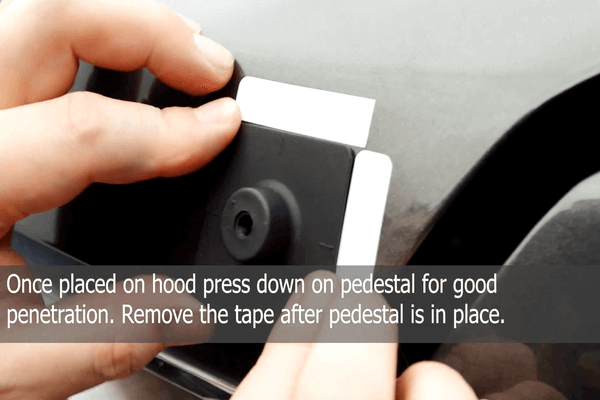
- Repeat for all pedestal locations.

- Removal all tape around the attached pedestals.
- If you have a heat gun or blow dryer, quickly warm the pedestal bases to 40 degrees C (105 degrees F) to help the adhesive thoroughly bond to the hood.
- Do NOT overheat the pedestal or damage the paint on your truck.
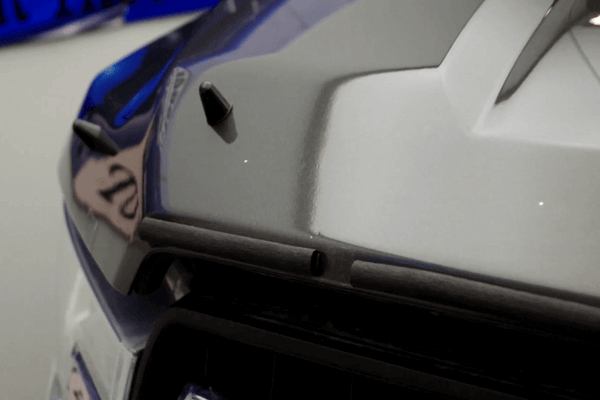
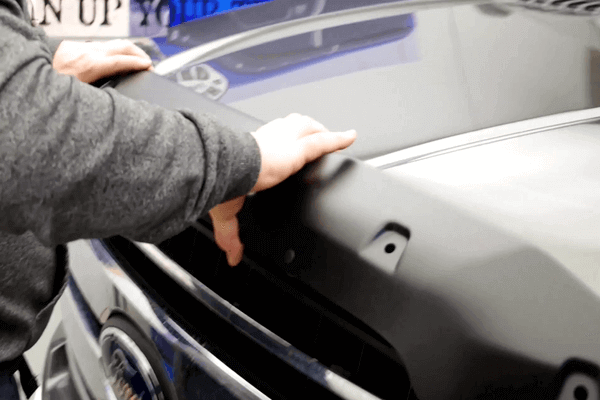
- Place the hood deflector on the centre of the hood, aligning with the holes in the pedestals.
11) Install Torx Screws
- Place the washer into the hole of the screw.
- Screw the Torx head through the washer.
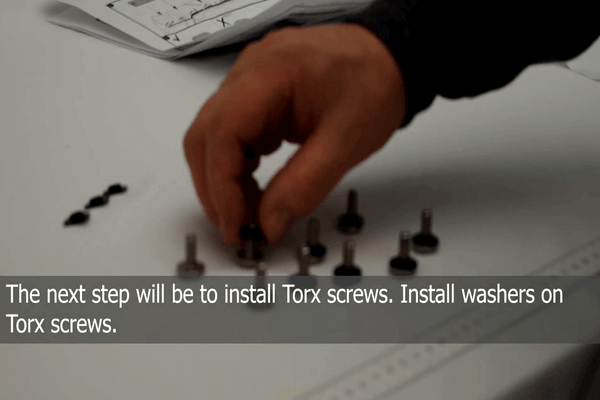
- Loosely thread the screw into the mounting pedestal in each location.
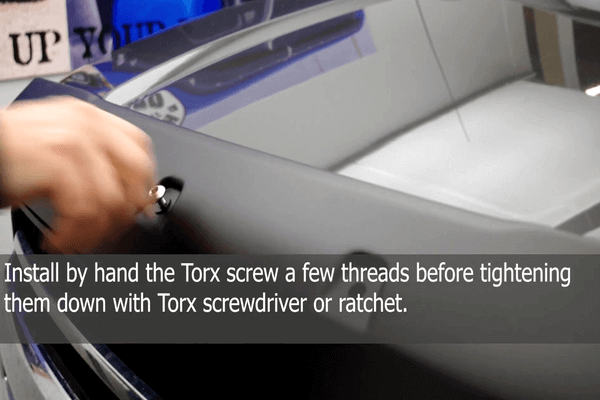
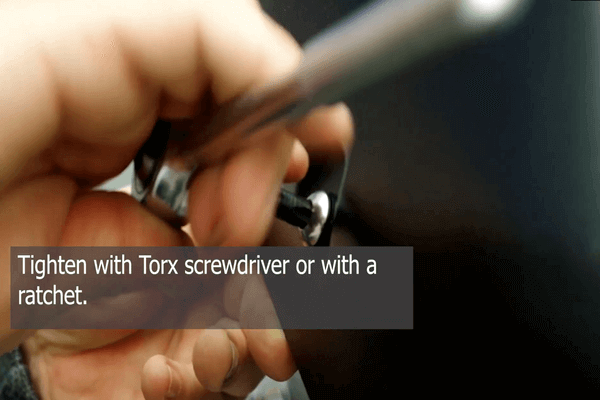
- Final step is to ensure the hood deflector is centred, then use the torx key or ratchet to tighten the screws, starting in the centre and work outward. And now you're ready to go!
Summary of steps to install a hood guard bug deflector:
- Clean the hood;
- Install the bumpons;
- Install the anti-abrasion film and gaskets;
- Install the clips;
- Install the pedestals;
- Test fit;
- Install torx screws
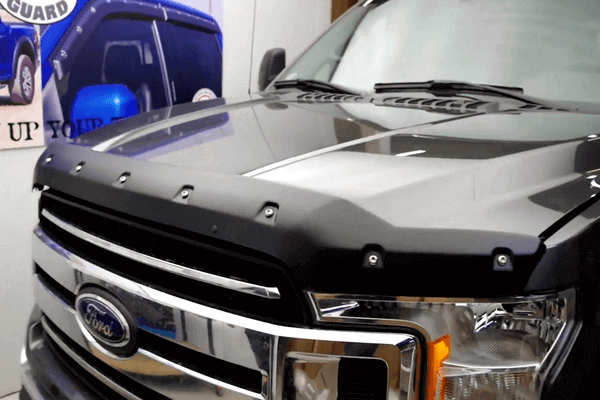
Now enjoy your newly installed hood guard bug deflector on the open road.
How to Remove a Hood Guard Bug Deflector
If the time ever comes when you need to remove a hood bug deflector from your vehicle, the process isn’t too difficult to complete at home if you work slowly. Higher quality bug deflectors with no drill installation use premium 3M tape which shouldn’t damage the paint on your hood. However, it’s crucial you slowly remove any pieces with adhesive in order to have a clean finish with no glue residue.
Required Tools for Removal:
- Screwdriver with T45 Torx and phillips head;
- Heat gun or blow dryer
- Water and basic soap;
- Paper towels or microfiber cloth
Summary of Removal Steps
- Remove front screws;
- Unscrew all Torx screws;
- Remove hood deflector;
- Slowly remove all bumpons and clips;
- Slowly loosen pedestals;
- Remove all pedestals and remaining glue
- Remove gaskets & anti-abrasion pads
- Wipe hood and remaining glue
Advantages of a Tough Guard Hood Deflector
Tough Guard hood deflectors are manufactured in Canada from an award winning automotive aftermarket manufacturer, Focus Auto Design, and are custom designed for your specific vehicle's generation.
The bug deflectors are thoroughly tested and it’s strong acrylic frame won’t chalk or fade over time from exposure to sun, rain or snow. An important feature it offers is no drill installation and no direct contact between the deflector and the hood, which makes for an easier installation and removal process that won't damage the paint on your vehicle. The hood protector includes 3M automotive tape, patented mounting clips and stainless steel fasteners for quick and safe installation.
The OEM quality design is suited for popular pickup trucks such as Dodge Ram, Ford F-150, Chevy Silverado, GMC Sierra, Toyota Tacoma & Tundra, and Jeep Wrangler models.
We hope this step by step guide was helpful to get your truck road ready with a properly installed hood guard bug deflector.
For further details on how to install or remove a Tough Guard hood deflector at home, please reference the installation and removal video guides found at the links below.
Tough Guard Hood Deflector - Ford F-150 Installation